Written by Kara Goodsell
This month we take a closer look at the basic standing pose, 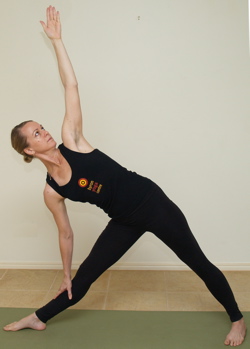
In Hindu mythology, the triangle is a potent symbol for the Divine Principle and the three sides of the triangle represent the forces of the universe: Brahma the creative force, Vishnu the sustaining force and Shiva, the force of change.
The triangle posture signifies the mind, body and spirit of the aspirant yogi and emphasises the 3 parts of the interplay of forces: dependency, interdependency and interaction.
The qualities of the triangle and Trikonasana are strength, the ability to support weight and the ability to resist pressure.
Sanskrit
tri = three
kona = angle
asana = comfortable seat
Contraindications & Cautions
-
Neck problems: avoid turning the head to look upward; continue looking straight ahead, or down towards the floor, keeping an even length in both sides of the neck;
-
Sacroiliac: allow the top hip to roll gently forward;
-
Hamstring/adductor tear: avoid the posture;
-
If any lower back pain is experienced in the posture , raise the torso higher, or alternatively come out of the pose;
-
Late pregnancy: use props for support (eg bottom hand on the seat of chair)
Benefits
-
Increases the lateral flexibility of the spine, developing the muscles on either side of the spine and stimulating circulation to the spinal area of the body
-
Strengthens the ankles, thighs, knees and calves;
-
Opens the chest and increases lung capacity, allowing for deeper breathing;
-
Stimulates the abdominal organs and restores the digestive fire;
-
Stimulates the cranial nerves associated with the sensory organs of the head;
Foundation:
-
From Tadasana, step the feet just over a leg length apart. Turn the right foot 90 degrees to the right and the left foot slightly toward the right.
-
Line the heel of the front foot with the centre arch of the back foot. Lengthen and broaden the soles of the feet and spread the toes. The weight should be distributed evenly between the inside edge of the front foot and the outside edge of the rear foot.
-
Raise the arms to shoulder height and extend the arms parallel to the floor, palms facing down and lengthening away through the fingertips. Extend away upward through the crown of the head and out through the fingertips, and lengthen the tail bone and sacrum toward the floor as the navel lifts to the spine.
-
Inhale and raise the right arm slightly, lengthening the torso from the hips to the armpits and lifting the right rib cage, reaching forward with the finger tips.
-
Exhale and extend the right arm and torso to the right (directly above the right leg) and lower the right hand as far down the front of the right leg as is comfortable. Those with more experience may wish to rest the back of the hand against the inner shin and calf, with the palm open and fingertips pointing toward the floor.
-
Lift and lengthen from the crease of the right hip, creating length in the underside of the body, allowing each rib to separate from the one next to it.
-
Extend the left hand upward, directly above the left shoulder, with the palm facing forward and fingers pointing toward the ceiling. Broaden and separate the shoulders away from each other, extending through the thumb of the lower hand and the little finger of the upper hand.
-
Tuck the chin in toward the chest, so that the forehead is higher than the chin, and gaze up toward the thumb of the raised hand.
-
Keep the torso extending to the side and in the same plane as the legs and rotate the torso and navel up toward the ceiling, drawing the sternum away from the pubic bone and feeling a spiraling action from the left hip upwards through the spine and out through the little finger of the left hand.
-
Hold and breath: On the inhale, expand and lift the chest and on the exhale increase the twist by rotating the whole torso and navel more toward the ceiling.
-
To release, on an inhale allow the upper body and right arm to raise to an upright position and lower the left arm.
Alignment & Anatomical Focus:
At either end of the spine lie the triangular shaped bones of the sacrum (at the base) and the occiput (at the base of the back of the skull).The asana has two lines of energy radiating outward from the centre pelvis. The first line of energy moves down the legs and into the feet. The second line travels through the spine and arms into the hands.
Feet, Knees & Thighs:
The distance taken between the feet depends on the level of experience – if the feet are too far apart, it is difficult to engage the quadriceps and significant strain can be placed on the joints and connective tissue of the weight bearing structures. If the feet are too close, the energy of the inner legs is lost and there is a decreased mobility in the hips and spine.
The alignment of the feet is such that if a line were to be drawn from the front heel, it would intersect the arch of the rear foot and the weight of the body is distributed evenly between the inside edge of the front foot and the outside edge of the rear foot.
As in Tadasana lengthen and broaden the soles of both feet, spreading the toes wide and pressing the base of the front big toe down into the floor, staying on the inside edge of the foot. Use the entire weight of the back leg and hip to press into the outside edge of the back foot, simultaneously anchoring down and drawing the energy from the earth up. Keep the inner arches of both feet lifted.
The front thigh is rotating externally, in an outward direction, so that the centre of the thigh, knee and shin are directly in line with the centre of the front foot. As there is a tendency for the front thigh to rotate inward if it is relaxed, it is important to engage the quadricep muscles to the bones, tightening the skin of the thighs and lifting the knee caps towards the tops of the thighs.
Avoid resting or sinking into the front leg, rather lift the entire leg (femur bone) up in to the hip socket, raising the inside and outside of the knees equally. Keep the quadriceps lifted and take care to avoid hyper extending the knees. Any pain or sensations from within the knee are important signals to stop and adjust the action or position.
There is a tendency to allow the rear thigh and knee to roll forward. Resist this action by keeping the rear hip, inner thigh and knee drawing strongly back within the pose, so that the sitting bones move away from each other in opposite directions.
Pelvis and Hips & Torso:
NB: Avoid trying to force the hips on top of one another (which is not anatomically possible in this pose!), rather allow the back hip to soften and have the feeling of broadening the front of the pelvis.
As you move forward into the pose, hinging from the hips, imagine the pelvis as a bowl tilting toward the front leg like pitcher pouring water. Elongate the spine out of the pelvis, moving the tailbone and crown of the head away from each other and lengthening the tailbone away from the lower spine as the navel lifts upwards and inwards towards the spine.
Contract the skin on the upper side of the torso and lengthen the skin on the underside, focusing on finding and maintaining length in the underside of the body, taking the upper kidney into the body and the lower kidney toward the floor and head.
Keep the torso in the same plane as the legs and rotate the front torso up towards the ceiling, creating the sensation of drawing the underside ribs forward and the upper side ribs backward.
Keep the length in the front torso by drawing the sternum away from the pubic bone and the shoulder blades drawn into and down the back.
On the inhale, lengthen from the waist up to the crown of the head and on the exhale spiral the torso toward the ceiling.
Shoulders, Arms & Hands
The collar bones are broadening away from each other as the arms separate to help broaden and open the chest.
Keep the shoulders moving away from the ears and the shoulder blades (scapulae) moving down toward the tailbone, drawing the shoulder blades into the back of the body and lengthen the neck away from the shoulders.
Keep the fingers spread and elongate the fingers from the skin at the base of the palm to the fingertips. The action of the palms and fingers affects the opening and movements of the chest. When the palms are closed, the chest drops. By extending the little finger, the back of the chest lifts; the middle finger connects to the middle chest and the extension of the thumb opens the front and armpit side of the chest.
Lift from the centre front of the chest out through to the tip of the thumb.
Head, Neck & Face
If the neck allows, gaze toward the tip of the raised thumb with the entire face, looking with the lower eye equally as with the upper eye and the tip of the nose pointing toward the ceiling.
Maintain the length in the back of the neck by drawing the chin in toward the chest and keeping the forehead higher than the chin.
Keep the muscles of the neck and face relaxed and maintain an evenness of breath throughout the pose.
Sources:
-
The Path to Holisitic Health: BKS Iyenger, 2001 Dorling Kindersley Limited
-
Yoga Anatomy, Leslie Kaminoff, 2007 Human Kinetics
